
Level 3
Final Project
Level 3- I’m going to create a new level for my game, I’m going to do some research on old retro games and try and get more ideas for the next level – maybe design a new platform layout, make the level harder, make it more of a challenge.
I’m now going to create a new level and call it ‘Level 3’ and then add the main parts to that level that I mainly need, I’ll add the background, character because they’re the main parts.
I’ve now got my character and background now into Level 3 and changed a few bits in the code to get it working correctly, the screenshot below shows my character in the new level and shows the background. There is a platform in the picture but that’s there to test to see if the character works all fine, which it does.

Now I’m going to do some research on google or YouTube to look for old retro platforms and see how the platform/level is laid out so I can get an idea to create my new platforms for Level 3.
My Game
I’m making a 2D game that makes the 2D character move, I got my character idea from the 17th-century paper cutting. (picture below) And I want to keep it that black and white theme.

Information about paper cutting:
Paper-cutting or paper cutting is the art of paper designs. The art has evolved uniquely all over the world to adapt to different cultural styles. One traditional distinction most styles share in common is that the designs are cut from a single sheet of paper as opposed to multiple adjoining sheets as in college. (Research from Wikipedia.)
Sketchbook Ideas
In this slide show, I’ll be adding ideas from my sketchbook that I think will go great in with my game or just ideas I think of that could fit or make my game better, just random ideas.
Platform ideas/designs
Below I’ve got some pictures (in a slide show) some of the pictures are from researching online and some are from real life, I went to this old retro game shop in Nottingham and they had all the old retro game consoles, and you get to go around and play on them all, going around and playing all these retro games gave me more of an idea towards my 2D game and what to add.
These pictures have all different styles and design layouts and these are a great help for my game because they give me of a range of ideas for my layout and design.
The idea for my level
I want to add a door/key system into my new level, where you go and collect a key and then go to a door and unlock it – by unlocking it you can continue on with the level. I really think this idea will be great for my game, it gives it more of a challenge to the level and more fun.
I’ve had an idea of making text pop up and then despair at the start of the level explaining what to do in the game.
Example “Collect all Paper Icons to complete the level”
More examples below on the picture.

SEGA

What is Sega?
Sega was the biggest name for consoles when it first came out and had competitors such as Nintendo.
SEGA is a Japanese multinational video game developer and publisher headquartered in Tokyo, Japan. The company, previously known as Sega Enterprises Ltd. and Sega Corporation, is a subsidiary of Sega Holdings Co., Ltd., which is part of Sega Sammy Holdings. Its international branches, Sega of America and Sega of Europe, are respectively headquartered in Irvine, California, and London. Sega’s arcade division, once part of Sega Corporation, has existed as Sega Interactive Co., Ltd., also a Sega Holdings subsidiary, since 2015. The company was found in 1960, which became known as Sega Enterprises.
(This information was found on Wikipedia)
Sega games
STREETS OF RAGE
Streets of rage is a street fight 2D video game where you have to go around the city fighting enemies and becoming the hero of the city.
I really like this game because you get to go around defending the city beating up the enemies and winning the levels.
The colours really stand out in the game because they’re very bright colours. Colours like this make the game. I like the idea of getting three lives before the game restarts, this could be a good idea for my game, I could maybe add three lives and enemies too.
Here’s some gameplay of Streets Of Rage:
ALEX KIDD
Alex Kidd in the Enchanted Castle follows Alex as he fights his way through the fictional planet Paperock in search of his long-lost father, King Thor. Alex has access to several items and vehicles that help him complete his quest, including a motorbike, pedicopter, and Pogo stick, which each gives him unique abilities. While traveling through eleven worlds, Alex must defeat several opponents in “Paper, Rock, Scissors” before finally finding King Thor.
My ideas from this research
I like the idea of having several items and vehicles to help him complete the quest. This can help me in my game by adding a weapon or something to fight an enemy if I add any. I like the colours all very bright and the theme goes really well, it’s like an old desert kinda theme.
I also like the idea of moving vehicles too that he has to dodge on the way and also shoot items to collect coins.
Here’s some Game Play of Alex Kidd:
SONIC THE HEDGEHOG
Sonic The Hedgehog is my old time favorite retro 2D game. The first ever Sonic game was released in 1991 by Sega.
Sonic the Hedgehog is a video game franchise produced by Sega centering on a series of high-speed platform games. Sonic, the protagonist, is an anthropomorphic blue hedgehog with supersonic speed. Typically, Sonic must stop antagonist Doctor Eggman’s plans for world domination, often helped by his friends, such as Tails, Amy, and Knuckles.


My ideas from this research
I really like the idea of the powers Sonic has, they’re really effective in the game also the super speed is really fun to use, this could give me an idea of adding powers into my game but not sure just yet. The idea of collecting coin/rings is a really good idea, the more you collect the more points you get, I got this idea for my paper icons the more you collect the more points you get, it makes the game more challenging and fun.
Sonic The Hedgehog Game Play:
The one game that made me aim towards for the layout and design is Super Mario, it’s a classic old school game which everyone loved, I really like the style of the game, the detail and how it’s just plain and simple but really affected. Bellow, I will leave a link of the old Super Mario game-play so you can get the feel of the old retro styles.
Super Mario Game Play:

I like the platform layout so you have to jump onto each platform to get up to the top, I think this will be a great effect for my game. Also, I like the plain and simple colours with the background too, this has made me think about keeping the colours simple and not too many together.

I like the moving platform idea in this picture, I like you can get from one place to another and this has given me an idea for my game, In my designs I’ll add a moving platform and also in my game, I think this will make my game more fun and more of a challenge.
 In this picture I really like the brick style as the border around the game, I think this will give my game more detail and more of a story to the game. Also, it has keys and doors, this has given me the idea to add a key and door system into my game, I think this will make my game twice as fun.

I really like this door design, it’s made out of like lasers which is really cool and it gives it the retro feel from the old 2D games which I like. This has given me an idea to create my door just like this but with just one laser and a different style.

I really like this style of the key, because it’s the same style as the door and it has the retro feel to it as well, but when I create the key it will be similar style but my own style.
This is my door side by side against ‘The Final Barrier’ door. I created my door based on the laser door and wanted to do the same because the laser on the door is really cool and a really good idea and I do prefer that to my own door.


This is my key side by side against ‘The Final Barrier’ key. I created my key based on their key because it was like a laser key just like the door but I wanted to keep the key the same theme as my game theme. But I do think my key turned out better than the laser key.


Sound Effects
I’ve already got some sound effects created for my game, I’ve got a jumping effect, pickup effect and I’ve music for the background. The jumping and the pickup effect was created by me and they’re old retro sounds which go perfect with my game so I’m going to carry the sound effects over and use them for my new level.
Music
I’ve already got music for my game, it’s a retro soundtrack and goes perfect with my game so I’m going to carry it over onto my new level. At the start of the main menu, there’s a different soundtrack but when you start level one it changes. The old retro games have given me that idea to add my own retro soundtracks games such as – Super Mario, Pacman, Street Fighter and many more.
The reason I’ve chosen retro music is that my game is based around retro and I wanted to keep it all retro feel.
Platform design
With my new platform design, I’m going to keep the same design with the paper cutting (picture below) and keep it all the same colour but have it all laid out differently, with the research for the old retro designs they’ve given me an idea to create the platform for my new level.

For this, I’ll be using Photoshop to create my new platform for the new level, but first I need to draw up the design in my sketchbook. I’m going to draw up two designs and get feedback from people.
Platform one design
I really like this design because it’s like a little maze, you have to try and get to the key at the top and collect it to open a door. The brick for the border gives it that old retro feels with the grass as the floor.

Platform two design
In this design, I like the style of the border and the platforms, where they change from brick to stone all the way around the game. I also like the idea of the moving platform, it gives it that more of a challenge and makes it more fun.

Once a platform is chosen by with the feedback I’ll start creating the chosen platform in Photoshop. When creating in Photoshop I’ll be posting step by step screenshots so everything is recorded.
Feedback for two layouts
I put a post on my Facebook page to get some feedback from some of my friends and I also asked some people in the class, here are the results.
Chris: I prefer layout two to layout one because layout 1 looks too crowded and too much going on, whereas layout two is a bit roomier and I really like the idea of the moving platform.
James: I like layout one because the style is better then layout two and layout one has more of an old retro feel to it.
Ashley: I prefer layout one to layout two because it looks harder and more of a challenge to layout two, I also like the style of layout one too, I like the brick style for it.
Teresa: I prefer layout two to layout one because there’s a lot going on and I find it more of a challenge to complete the level, the more things to do the better for me. In layout one there’s not much in the scene and not much going on.
To do
- Create the background assets for my 2D game – Grass, and bushes.
- Create the chosen layout for the new scene for my game.
- Create a new layout and assets in Photoshop.
- Find tutorials for adding key and doors.
- Create key and doors in Photoshop.
- Find tutorials on how to create animations for the doors.
Update
After doing research and gathering feedback I’ve now drawn up my final design for my layout for my new level. I’ve made it into an old retro style (based on Super Mario) and I’ve used all the feedback I got from the two layouts I created and turned all of that into one. (picture below).

04/04/2019
Today I’ll be creating some of the assets for the background on my game. In Photoshop I’ll be creating the bushes for the background, these bushes will be black with white leaves on them (picture below) after creating them I’ll create the grass patches that go with the bush for the background.

Final bush design
I created these bush design to go around my level to be apart of the background, I didn’t want a plan simple background I wanted to add some detail, so that’s a reason why I created this bush to give it more detail and to make it look like there’s more to do in the level. And to still have the paper cut theme with the 2D retro look.

This is the bush from ‘Super Mario’, I got my bush idea from this game. I prefer mine to the Super Mario game because I like the style and the leaf patterns where Super Mario bush doesn’t have much detail but I do like the old look to it.


Creating grass asset
In Photoshop I’ll be creating the grass asset for my 2D game, the grass will be assets for the background just like the bush. Below is the design for the grass patch that I’ll be using.

Final Grass Design
I created this grass design to go with my bush design, the grass will go well with the bush so the bush is not on its own, the grass gives it more detail to the background. I also kept it plan like the paper cutting theme with the retro look.

I went into Unity and created a new folder in my new level and named it ‘Background’ so when I create all the background assets I can put them into that folder.

Paper Icon
I’ll not be creating new paper icons because I’ve got them already made from previous levels in my game. Below I’ll leave a picture of the paper icon to show you what it looks like.
During the level, the paper icons will be rotating while the game is playing and there will be 27 of them placed around the level and you have to collect them to complete the level.

I got the idea to have something to pick up from ‘Super Mario’ in Super Mario you have to collect coins whereas I changed and created mine to paper Icons based on my game theme.
Below is my Paper Icon against Super Mario coin, the coin spins so I made mine rotate so it’s similar and based from the coin but made into my own style.


I’ll now start creating the border for the level, in the chosen layout the border was made out of brick so I’ll be doing that but in colours of black an white.
A reminder of the new layout
I’ll be using Photoshop to create the border and then create the other parts for the layout bit by bit.
I’ve now created the border below I will post pictures of the left/right side of the border and the top but I’ll now create the bottom too which will be grass when all complete I’ll post pictures below.
How I created these? I went onto google and got a flat image of a brick wall and I went over the picture in Photoshop with a white paintbrush to draw the bricks and then got a black paintbrush and coloured in the bricks black.
With the grass, I done the same, got the image from google and turned it black to go with my black and white theme colour.

![]()

These are the basis for the border, I’m now going to add these into Unity and put the border together to have an idea what it would look like (picture below)
I added all the created borders created from Photoshop into my new created folder called ‘Background’ so that way it’s easier to find and access.
Border put together in Unity

Border in game

This border has come out a lot better then I thought it would, it stands out so much and gives you that old retro feel which I wanted.
I also added bushes and some grass assets that I created to see what it would look like and it goes really well with the theme. (picture below)

I’m now starting to create the platforms for in the level using Photoshop, I’m going to start from the top left of the new layout. (pic below)


I’m now going to create the rest of the platforms, I’ll post pictures of each platform I make side by side and then the final picture when it’s all put together in Unity.


I added in the moving platform from Level 2, I kept the same platform design from Level 2 so in the new level (level 3) I have something carrying over to each of the levels and it keeps the paper cutting affect too.
These two pictures below are the moving platform, the platform starts from the right (shown in picture one) and moves along to the left (shown in picture two).


I’ve now added the Jems at the top left of my new layout. The Jems act like platforms but a lot smaller, you’ve to jump on them to get to another platform but its a lot harder. (I know Jem is spelled with a ‘G’ but I want it to have a twist and be different for my game)


I had to change a little bit of this right hand side (pictures below) because the height of the door you can’t jump over to get onto the platform so I had to move it all down a little and add a little step (on the right picture) so I can jump on that and jump above where the door is going to be.


I got my platform design ideas from ‘Super Mario’ below I will put side by side a picture of my platform and a picture of ‘Super Mario’ platform.
I got the brick design from the game and used it for mine but I think mine came out better than the ‘Super Mario’ platform. But I do like the detail within the brick on ‘Super Mario’ platforms.


While looking at my game level layout I got an idea because at one spot on the level I had a lot of room left, so I decided to add an extra platform, I’ve drawn up the idea in my sketchbook (picture below) and I will add this idea into my game.

As you can see in the picture I’ve added a platform dropping down from another platform and I also added more Jems so you have to jump on them from the moving platform to get onto the new platform.

I’ll finish up adding the rest of the items to go into the level and then I’ll decide if I want to add the new platform (pictures above).
After thinking about this idea I decided not to go along with it and leave the design as it is.
I’ve now the rest of the Jems as you can see in the pictures (below) the Jems are to get up to the top platform where the finish door is going to be.


I’ve now added all the platforms, Jems, Bushes and grass patches into the new layout. Below you will see the final picture of the basic layout and how it will look.
I think adding these assets in the level is a really good idea because it makes it more filled up and less empty in the level, it kinda makes it look like there’s more to do then there is.

In the picture below you can see that I’ve added a script to the Jem, this script gives the Jem power to move left to right just like the moving platform. I added this to the Jem to make the level a bit harder to complete and more of a challenge. This level is now more towards a skill game which most of the old retro games were.

To anyone who wants help with moving objects just like my platform and Jem, I’ll leave the code below.
Code:
public class movingJ : MonoBehaviour {
float dirx, moveSpeed = 2f;
bool moveRight = true;
void Update()
{
if (transform.position.x > 5f)
moveRight = false;
if (transform.position.x < -1f)
moveRight = true;
if (moveRight)
transform.position = new Vector2(transform.position.x + moveSpeed * Time.deltaTime, transform.position.y);
else
transform.position = new Vector2(transform.position.x – moveSpeed * Time.deltaTime, transform.position.y);
}
}
In this YouTube video (below) I show you an example game-play of my new level, in this video, I show you that my character can move around and jump. Also, I show you that the moving platform is working and the Jem. It also shows that you can jump on the Jems and platforms.
24/04/2019
I’ve now added the script for the camera movement, so when I move around the level the camera follows my character. In the screenshot below you can see I added the script (CameraFollow3) to the main camera.

I’m now going to focus on making the two keys and doors. To create these I’ll be using Photoshop, I’ll post screenshots down below of each one after I’ve created them.
Key
This is the design I’ve gone with for the key for my level. I kept the paper cutting theme to make it go with it but gave it the old school look.

Update:
After talking with Matt we decided I should focus more ideas for the game, so we have done a list of things I can do (picture below) I now decided to create my own enemy characters, first I’m going to draw them up in my sketchbook and have different ideas from Google to create one. All the pictures I used for ideas I’ll post pictures below.

Ideas from Google for the enemy:


Sketches of my enemies.


To create my enemies I’ll be using Photoshop, I’ve taken pictures of my sketches and downloaded them onto the computer and imported them into Photoshop to get started.
Enemy one.

I also created the version for when he dies (picture below)

Enemy update:
I’ve decided not to add the enemy just yet and going to focus on adding the final pieces to the game.
Now I’m going to create my own background for my level, me and Matt had spoken about getting a piece of paper and dabbing it with a tea bag to give it the old effect. The video below is showing the progress of me attempting just that.
Video:
After dabbing the paper with a team bag me and Chris made a line to hang the paper on to dry. (picture below)

After its all dry me and Chris will see how it turns out and I’ll post a picture when it’s dry below, that way we can see if we’ve done it right or wrong.
After picture:

I and Chris went and spoken to an art student to get ideas for creating the old background effect with a tea bag. She explained how she has done it herself, she used coffee, hot water, and a tea bag. We got some pictures of her work (pictures below)


This has given me really good knowledge on how to create stuff like this. After getting help from the old effect with a tea bag, we ended up with this (picture below) and I and Chris scanned it and then uploaded it to my PC, once it was on the computer I put it into my game and this is what it now looks like (picture below)
Scan:

Scan imported into the game:

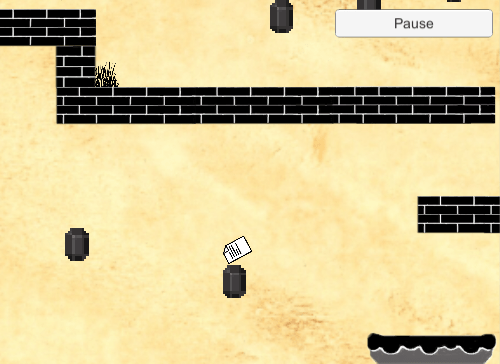
I’m now going to add the paper icons, the paper icons will be placed around the level and you have to collect them all to complete the level, there will be 25 paper icons in total to collect.

I’ve now added all the 25 paper icons around the level and I’ve tested to make sure when you pick up all the paper icons, the winning text appears (picture below)
![]()
Bug update:
While playing/testing my game I noticed the pause button at the top right doesn’t work when I try to press it, so I’m now going to go back over it and try and fix the problem. (updates will be posted below).
I’ve now added a pause button at the top right (picture below)
I was struggling to do this so I searched for a YouTube tutorial and I found a really good one (link below) this video helped me out a lot to sort this problem out.
YouTube link:
When I pause the menu a tab opens up and there are two buttons, one saying Resume Game and the other Quit To Main Menu (pictured below) both of these tabs work when clicking them during the game.

I went back into level 2 and noticed the door at the end of the level wasn’t there, this door takes you into the next level when entering, so I fixed that and added the door into the level and made it so when you enter you go into level 3. (pictures below)
Adding level 3 to build settings:

Add door into level 2 for entering level 3:

Audio update
I’ve now added in the background music into my new level, I then made a new folder called ‘background music’ in my ‘sound’ folder. With the background, I’ll be using the same music throughout all the levels and all I had to do is just copy and paste the music into the new level (picture below) which now starts and plays when the level is played.
I’ve added in this music to make the game more enjoyable and not boring, the music gives the game more of a boost because I wouldn’t want to play a game with no sound/music and play it in silence, I wouldn’t enjoy it as much.

Going back to the key and door system
I’m now going back to do the key and door system. After following tutorials on YouTube (Links below). In the game I can now pick up my key and it will transfer into my inventory and I can walk up to the door and now unlock the door with the key (screenshots below) but I’m having a couple of problems, to make the door swing open you need to make an animation and attach it to the door in unity but the problem I’m having is my animation in looping and I need it to not loop and have the animation to work only when I open the door with the key. So I’ve done loads of research but can’t seem to fix this, I and Matt are going to sit down and try to sort this out.
YouTube Link:
Screen Shots


My problem with animation

I’m not sure if I’ve done the animation the correct way or not so that’s why I’ll do more research and sit down with Matt to try and sort this.
I found a tutorial for the animation for the door, so I’m making my animation from scratch again using in Photoshop (pictures below) when I’ve completed creating them I’ll follow the tutorial and see how I get on from there.
YouTube tutorial:
After following the tutorial I had the animation working but I still got the ‘Open’ does not exist error, I tried looking online to solve it but in the end, it was to do within the animation itself. I had to add a bool within the animation and then attach it from the door to the animation (pictures below) the pictures will give you more of an idea what I’m explaining.

These screenshots (below) are the arrows attached from ‘Idling’ to ‘DoorAnimation’ you have to uncheck ‘Has Extra Time’ on both and on ‘Idling’ on ‘Conditions’ you have to set it on ‘true’ and for ‘DoorAnimation’ it has to be set on ‘false’
The ‘Idling’ is the door when it’s not moving and linking up to the ‘Open’ (which is a bool) when triggering the animation the ‘Open’ will trigger the ‘DoorAnimation’ to work.
After all that and getting the animation to work when triggering it I couldn’t get through the door after the animation was finished, this is because the 2D box colliders were still there and didn’t move with the animation. (picture below) In the picture, you see after the animation had finished the 2D box collider was still there and had not moved.

I searched and searched until I found a solution to fix this problem. I found this form on google and it had the solution (picture below)

Link to form:
https://answers.unity.com/questions/1204815/how-to-update-2d-colliders-with-spirte-animation.html
All I had to do is edit the box collider at every keyframe while creating the animation so that’s what I have done. (pictures below)


So at every keyframe, I had to readjust the collider to make it move with the animation.
I’ve now rearranged the potion of the key and the door (picture below) I moved these because I don’t want them right next to each other, I want to be able to go and collect the key and try and get to the door to unlock it and that’s what I’ve done.
I put the key at the top so you have to climb to collect it and moved the door on the right in the middle, the reason I put the door there is because you have to get onto the moving platform and then jump onto the moving Jem and that’s a bit tricky, so it’s more of a challenge to get to the door and not too easy.

Why did I choose to add a key and door system into my game?
I decided to add the key and door system into my game because I didn’t want my game to be boring and just collect paper icons, I wanted my game to have more to do in it and have more of a challenge. Adding the key and door system was to make it more of a puzzle type of game, where you have to go find items to continue within the game.
New Ideas?
Teleportation.
I’m thinking of adding teleportation into my new level, I’ve found a simple tutorial (link below) of how to create/make teleportation. So I’m now going to create my own teleport using Photoshop and when completed I’ll leave screenshots below.
Photoshop Screen Shots:
This is the design I’ve done for my teleport for in my game.

YouTube Link on how to create teleportation:
Adding water?
Bugs&errors
Bug/Error.
After installing this unity ad-don called ‘bolt’ it’s a system to make things work easier within unity, less coding and easier for new people to unity. When it was installed I kept getting errors and I couldn’t fix them (picture below of errors)
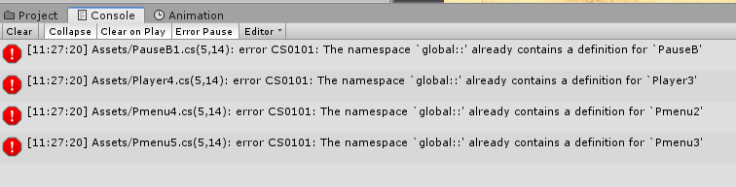
We even asked someone that knew a bit of unity but he couldn’t solve it either so, I deleted bolt and got my backup version of my game from my hard drive and it worked after that. So I now know adding things into unity can affect your files in the game.
I now have fixed all of the problems that my game was having, I did have to delete the door and key system and start again so that’s what I did. After following all the tutorials again my key and door system is now fully working and now all backed up on my hard drive.
Bug:
I found a bug in my game when I collect the paper icons you collect 1 point and you have to collect 25 to get ‘you win’ text to appear but for some reason the points go up by one and then up by two. After you collect them all the paper icons the points add up to 40 and not 25. I’ll do research to try and fix this but if I can’t find a way to fix it I’ll recreate the count system.
Update: I’ve still not fixed this bug, me and Chris will sit down and look through the code to see why it’s jumping up by two points and not one.
Error.
After copying my game folder from my hard drive to the college computer it came up saying that Unity has been updated and my game file is not on that new version, so after loading my game I just got loads of errors. My game was on version 2018.3.11f1 and the new version is now 2019.1.1f1 so my game file wasn’t on the right version and that’s what made the errors. I’m now trying to find a way where I can transfer my game file to the new version without loosing/getting errors.
The college has now fixed this issue by uninstalling all the version and installing the version I need.
Bugs to fix.
I have got a new bug on level 1 where when you pause it you can resume or quit to the main menu, the pause works but the quit to the main menu don’t. I’ll go through this and fix it.
I’ve now fixed this error, I just copied the other levels Pause menu script and changed a few bits to match level 1 and then it all works fine.
Main menu – on the main menu I’ve have two buttons, one button says ‘Start Game’ the other says ‘Quit Game’ when I build the game to test it the ‘Quit Game’ button moves to the left for no reason (pictures below) so I’ll have to sort that out to make it not move.
This is what the main menu is supposed to look like.

And this is what it’s looking like after I do a build to test the game.

I’ve now fixed this bug, I had to Anchor the buttons in place, so when you anchor them it’s like you pinned it there and it won’t move. (screenshot below) of the new menu after fixing the bug.

Main Menu Update:
I’ve now added couple more retro characters to the main menu (picture below) so it’s not as empty and there’s more detail to the menu. This can give people flashbacks to the old retro games with the pictures and can make then want to play retro games and to try out my game.

On level two the pause menu is supposed to be after the top right (picture below) but in the build, the pause menu has moved on its own (picture below)
This is what the pause menu is supposed to look like when the game is running.

This is the pause menu in the build (below) as you can see it’s not at the top right, it has moved down, so I need that to be at the top right.
The problem is the anchor on the button. I just have to readjust them.

I’ve now fixed this issue (pictured below) all I had to do was set the anchor for the button to a certain place and anchor it there, what that means is when you anchor it where you want it, it will not move after, it’s like gluing it down.

Level 3 Update:
I’ve now added text for when every level starts, I wanted to add text so that people can understand the game more and have a better idea on what to do. When I play new games I like to know a little bit on what I’ve to do and that’s why I’ve decided to add text for each level. Below I’ll explain on how to code/script is put together and also leave a screenshot of the code itself.
Code

within the script, you can set the timer to whatever you like, with my text I’ve it set to 5seconds so it gives people a good time to read and get the idea.
Also for this to all work, you have to add the script to the main camera. Then all you have to do is drag the startup text into the box within the Canvas Text 1 (pictured below)

Level 1 startup text
I’ve now added in the startup text for when level 1 starts, I’ve chosen to have “Collect all Paper Icons and proceed to the next level door” (pictured below) I’ve chosen to have this because the person who’s playing the game will know they have to collect the paper icons before proceeding into the next level. And it’s giving them information for the other levels.

Level 2 startup text
I’ve now added in the startup text for when level 2 starts, I’ve chosen to have “Jump on the moving platform to gain access to higher platforms” (pictured below)

Level 3 startup text
I’ve chosen to have “Collect the key and open the door” because then they would know there’s a key within the level and they would have to collect it for a reason.

Update
I’ve now added Post Processing to my new level so now all three levels have now got Post Processing effects. (pictured below) there will be before the effects after they’re added.
Before

After

I’ve added the post-processing effects onto my level because it gives you that action feels within the game and it makes the levels look a lot better.
Below I’ve added my front cover for my game, the cover explains everything you need to know about my game and how to play it. And also below I’ll leave my Project Proposal.

Leave a comment