
Project Proposal
My Project Proposal – Click to download
My Theme
My theme idea has come from apoplectic films and some games. I like the idea of the streets being empty, destroyed, and overgrown. These types of films/games are perfect to get ideas to create my own scene using Unity.
I want to create a scene using these ideas and to have a street view that’s overgrown but not too overgrown, destroyed with some cars all smashed up and some on fire, buildings, and other items in the street to be broken/destroyed. I want to have that dark but not too dark scary feeling theme which is perfect from zombie films or games.
My ideas for the scene
I would like to have lamp posts going down the street, some broken/falling over and some lamp posts to have the lights still on and a few of them to be flickering to give it that scary, dark, and zombie feeling.
I also want to have eclectic line polls too, I want one or two of them to be sparking and the rest to be fine, with some electric polls sparking it will defiantly give it that scary feel.
Where I got my ideas from
When thinking about this idea the first film that came into my head was the film called “I am Legend” this is perfect to get ideas from because the film is based around my theme, it has zombies, it all abandoned, destroyed and overgrown.
I Am Legend
The film is based around a scientist (Will Smith) who is the last human survivor of a plague in the whole of New York. He attempts to find a way to reverse the effects of the man-made virus by using his own immune blood.
As you can see in the picture below is a screenshot from the film of him walking through one of the streets of New York. As you can see in the picture the street is empty, destroyed, abandoned, and overgrown.

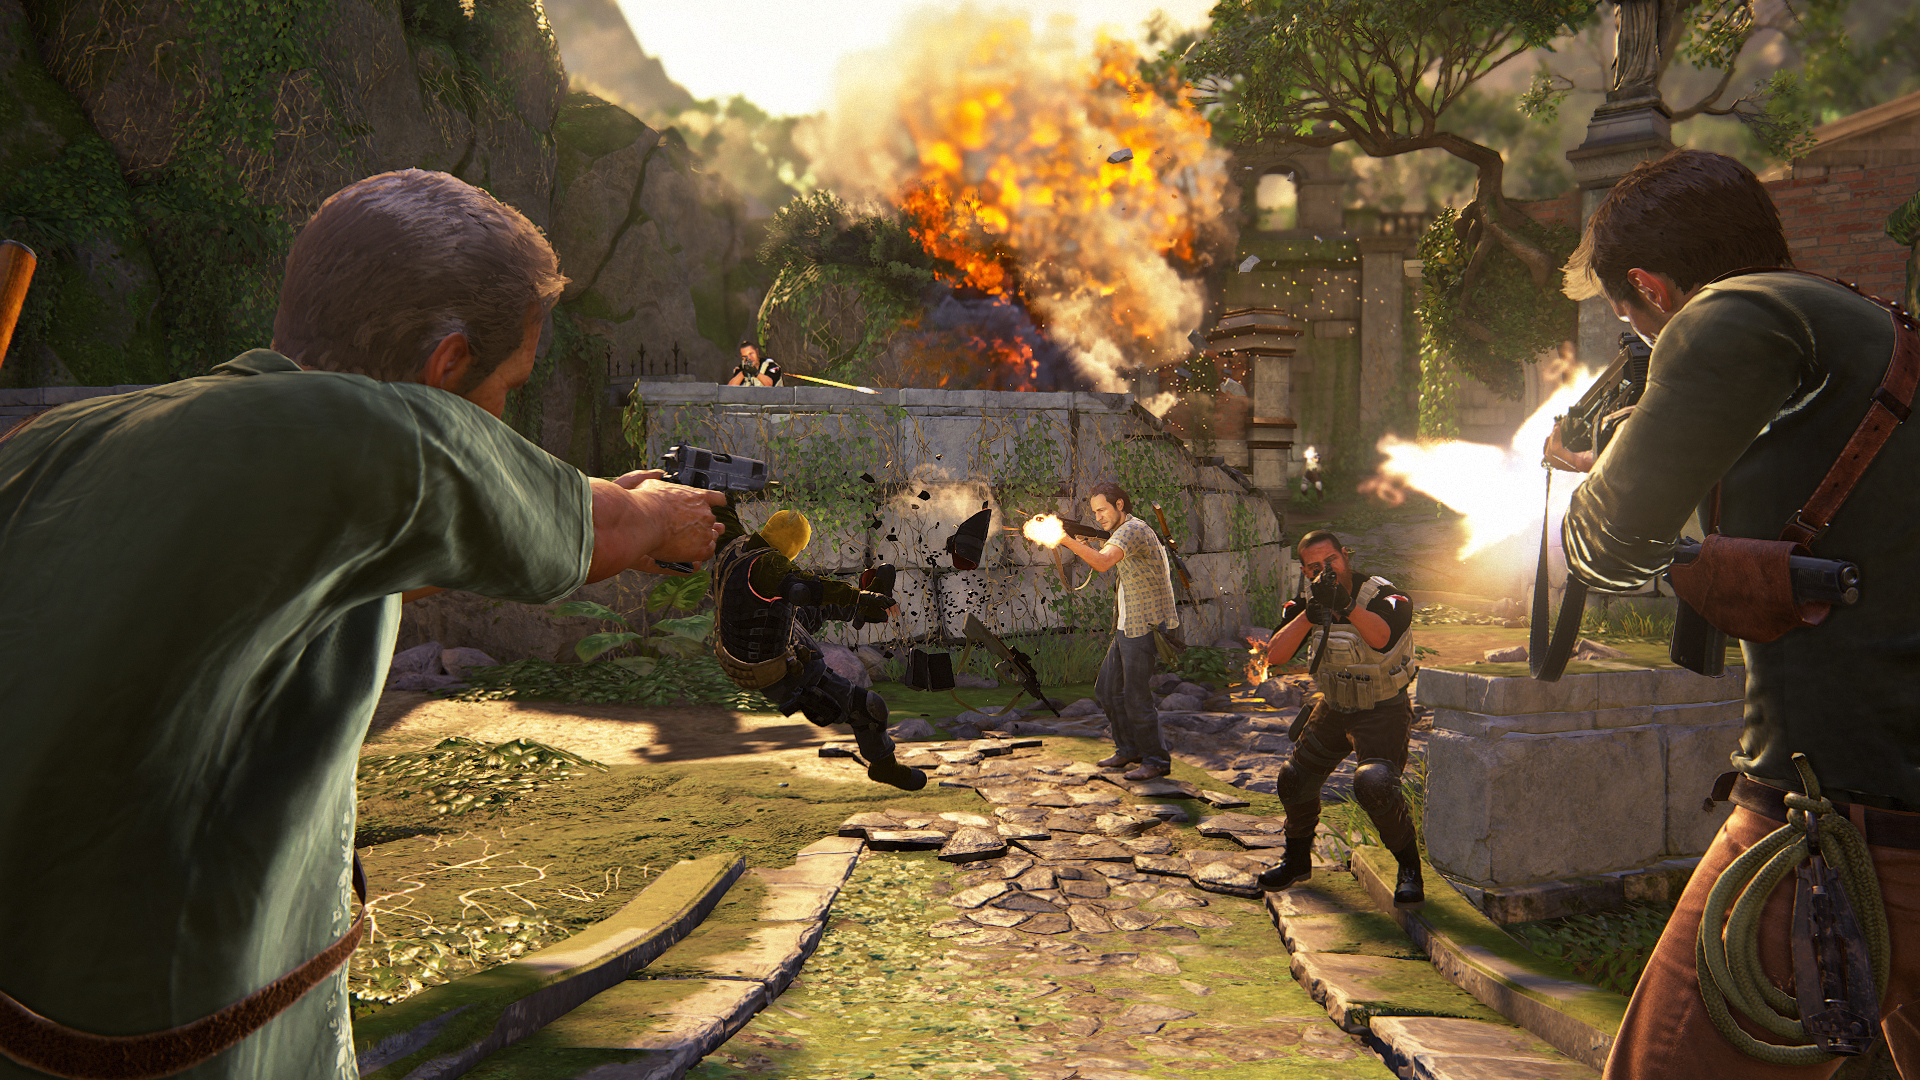
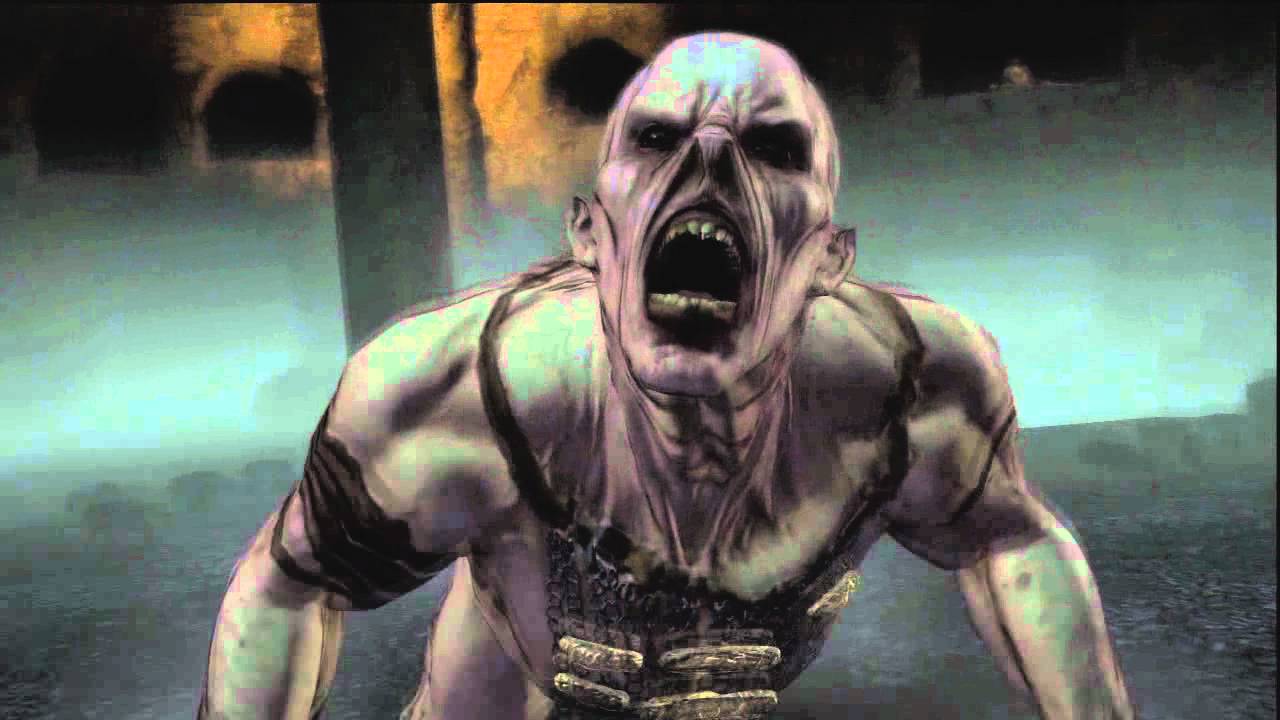
Uncharted 4
This game (Uncharted) is a game about searching for long-lost treasure and the aim is to go through loads of abandoned places/levels during the story mode to collect this treasure and survive. Also throughout the game, you are attacked by zombies too and this again is basically the same as the film “I am Legend” and fits perfectly for my theme.
Below I’ll leave some pictures of the game throughout the levels.
Some abandoned buildings


Zombie
When was the first uncharted game made?
Uncharted: Drake’s Fortune is a 2007 action-adventure game developed by Naughty Dog and published by Sony Computer Entertainment. It is the first game in the Uncharted series and was released in November 2007 for PlayStation 3
At the moment there are 6 uncharted games that have been made.
Released in 2007

Released in 2009

Released in 2011

Released in2012

Released in 2016

Released in 2017

These two films/games are great to give me ideas and what kind of details to have to create my street view scene which I’ll be created by using Unity.
![]()
What is Unity?
Unity is a cross-platform game engine where you can create all types of games that were developed by Unity Technologies, first announced and released in June 2005 at Apple Inc.’s Worldwide Developers Conference as a Mac OS X-exclusive game engine. As of 2018, the engine had been extended to support more than 25 platforms.
For example one of the top mobile games “Angry Birds” was created using the game engine “Unity” back in 2014.
Boneworks
Boneworks is a virtual reality game developed and published by Stress Level Zero. It was developed using the Unity engine and supports all PC-compatible VR headsets. It was released on Windows on December 10, 2019.
Boneworks was also created using “Unity” the same software I’m using now to create my scene.
![News - BONEWORKS - BONEWORKS Update 1.4 - [REDACTED]](https://steamcdn-a.akamaihd.net/steamcommunity/public/images/clans/34616206/969eb01f7d6c8bbacd0052dfa1b4d84e2cb05a0a.png)
Boneworks is a story mode game and throughout the game, you come across zombies that you have to fight. This is perfect for me to get ideas for my scene because the game has loads of different levels and they’re all different.
Below is one of the scenes and it’s similar to my design, old and overgrown. This can give me ideas for what I can use.

In boneworks you can find and pick up a flashlight (picture below) and this had given me an idea to maybe add one into my scene and maybe be able to pick it up.

Below is a video I found on YouTube, and after watching this video it gave me so many ideas on how to set up my scene, what to put into the scene, and also what to add.
This is a brilliant video to watch if you’re just starting and want ideas.
My sketch idea
Below is a sketch I’ve drawn up, this drawing is an idea I’ve come up with using all the information from the film “I am Legend” and the game “Uncharted”
![]()
When using Unity you can download free assets from the store, I want to try and create this scene only using “free” assets, below I’ll leave a slide show of pictures of all the free assets I’ve used during this project.
I will keep searching for free assets during the time of making my scene, mainly with a New York theme.
Pictures of free assets I used
With my theme being dark and spooky because of the apocalyptic theme I’ll have to find light fog in the assets store and with the lights, I’ll create that myself using spotlights provide within Unity. Below is a tutorial I found on how to put spotlights onto lights/lamp pots.
Where I want some of the lights to flicker I’ll find a tutorial on how to do that, f I do find one I’ll leave it below.
To find/do:
-Spotlight tutorial – how to make the light flicker.
-Free electric pole assets.
-Draw more layouts for my scene.
-Layout all the free assets I’ve and chose what’s the best to go with my theme.
Flickering light
Today I’ve gone and downloaded a free asset from the store (screen-shot below) which provided lamp posts, traffic lights, and more. In my scene, I wanted to have some of the lights to flicker and today I’m going to make that happen. I found a tutorial on Youtube with a basic script for the flickering light and I just copied to code and figured out how to make the code work with the free assets I found today.
Below you will see a screen-shot of the free asset I download which provides all the lights etc and a video I recorded of what I’ve done so far with the flickering light.
Asset

What I’ve done so far with the lights
Video Tutorial for flickering light
After getting the code for the flickering light I wanted to add it to the lamp post and make it look realistic but in my video, I recorded it just didn’t look that real, so I have done some research and couldn’t find anything at all. I want the light to flash onto the ground and have the light bulb flashing too, so I played around with a few things and managed to solve it myself.
Below I recorded a video of what I’ve done, in the video you can see I’ve attached a light facing upwards to the bulb to make it look like there’s one and then added the flickering script to it to make it flicker with the other spotlight facing towards the ground.
Video
At the moment what I’m doing is getting the little parts done and out of the way, so the lights that be flickering, sparks for the electric line polls and fire for the cars. When they’re all done all I’ve to do is add them to the prefabs I want them for.
New road change
In the videos (above) the roads I had wasn’t that great, in my new asset I got for free from the store (picture below) had roads in the package and they looked a lot better and are better to work with.

The assets I used for the roads.

After adding the new roads into my scene I carried over the lamp posts from the video above (Updated version of flickering light – Unity) I came up with an idea while adding the lights into it.
I’ll have two street lights then I’ll have traffic lights the next then after that another two street lights. I’ll leave a sketch I drew up with the light/traffic light system below.

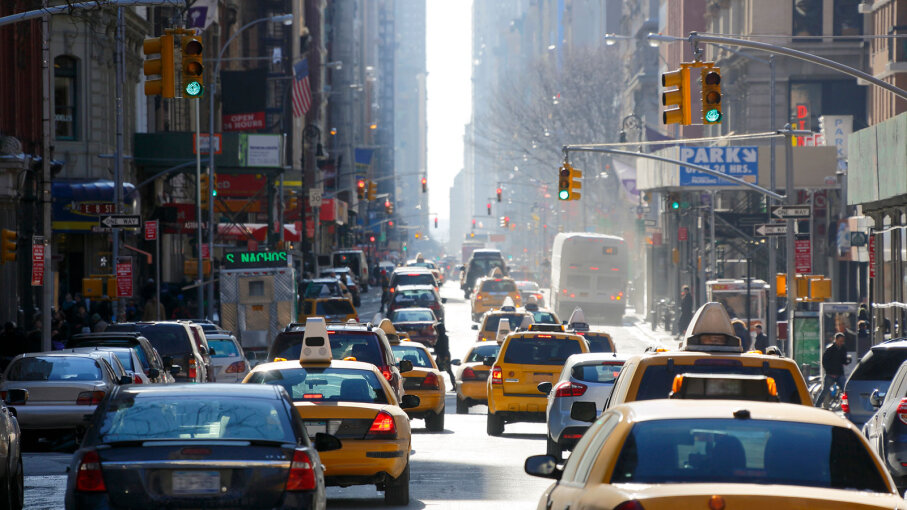
The reason I came up with the two lights then traffic lights is because in New York (what the theme is based around) is a busy place and they’ve loads of traffic lights down in one road because its a busy place.
In the picture below is a picture of a street in New York and as you can see its very busy and there’s a lot of traffic lights. This is my inspiration.
Update
In the picture below I’ve now added two street lights both with lights attached and the first street light will be the one with the flickering lights. I’ll now add traffic lights after the second street light as planned.

I’ve now added in two traffic lights, for now, I add one traffic light facing one way then the other another way because it’s a two-way street. Below will be two screen-shots of both views of the new traffic lights and I’ve also attached lights on top of the light attached to the traffic lights.


After adding the traffic lights in I came up with an idea because there are no lights on the traffic lights I want to add a flashing red, amber and green light but a different colour on a different light. So the left light will be red, the middle will be amber and the right one will be green. I’ll leave a screen-shot below when done.
I’ve now added a red light onto my traffic light (picture below) all I did to make this happen is add a spotlight and aim and point it where I want the light to be and put the “Intensity” up to make it brighter and then changed the colour of the light to red.
I’ll now repeat this to all the other light.

I’ve now added all colours to the traffic lights and added the flickering script to each one. Below I’ll leave a video of the lights when I play the scene.
In the video (below) I show that I’ve added spotlights aiming towards the traffic lights to make it look like the traffic lights are on and flickering.
New idea!
I came across this video on YouTube (video below) and basically, you scan anything you want and it will 3D model it for you and you can use and put it into Unity. This app is perfect for me because my theme is based on a street view, so what I’m going to do is scan my motorbike using the app and import the 3D model into Unity and use it in my scene.
I done some more research on the app/software on how to use it and import it into Unity, below I’ll leave a tutorial on how to do that, they show you how to use it and how to import it for Unity.
Below I’ve scanned my bike into the app “Display.land” for the first time and I followed the tutorial on how to get it into Unity and I did that. Below again is another screen-shot of my bike in Unity.
Display.land app scan

Bike model in Unity

For my first time doing this, I’m pretty happy but, the detail on the bike isn’t great. So I rescanned my bike and followed another tutorial but this tutorial lets you edit the bike model in “Blender” and then convert into Unity.
Below I’ll leave a tutorial that I watched on how to do that.
Below is what I’ve got now in blender, by following the tutorial I’ve trimmed my bike down so there’s nothing else apart from my bike showing.

Now I’ve completed the bike into blender and followed the tutorial, I’m now going to convert my mesh into Unity and use it in my own scene.
After following the tutorial on how to convert the blender mesh to unity and use it, I’ve now got my bike in Unity and looks a lot better than the first attempt. Below I’ll leave a screen-shot of my bike in Unity and the tutorial I used to convert from blender to Unity.
My bike in Unity

Tutorial
Updates
I’ve now made my road longer and I’ve added more street lights and also added more traffic lights. But the traffic lights will all be solid red and not flickering. (pictures will be below)
Also with the lights, I’ve made sure they’re the same length apart from each other all the way down the road so it doesn’t look odd and looks normal.


Adding sparks to power-line
Now I’ve the flickering lights working, I now want to have sparks coming out of some power lines that I’ll have in my scene, for this to work I download a free asset that provided me with the power lines and another free asset that provided me with the spark. I then added power lines into my scene and then the sparks and tested to see if this would work.
Below I’ll leave screen-shots of the free assets I used and a video of me testing to see if the sparks work with the power line.
Power-line and spark assets.


Video of the sparks and power-line in action
Added a crossing
After looking at some pictures on google of new york street views I came across this picture (below) and in the picture its got the street view and it has a crossing and now at every traffic light in my scene, I’ll add a crossing.

I’ve now added the rest of the traffic lights, street lights, and road markings all the way down the street. (picture below)

Adding Sewer Caps
I found some sewer cap prefabs in one of my free assets and decided to add them to the street. I placed them next to the street lights on both sides all the way down the street (screen-shot below)
This wasn’t in the plan but I think this is a great addon to the scene.


Adding new pavements
I’ve decided to add new pavements with carbs because I just didn’t like the way the pavement looked (picture above) so I made my own up using free assets, I’ll leave a screen-shot of the assets I used to create this.


After adding all the new pavements and carbs, here’s the finish paths for my scene.
Now I’ve the pavements I want I’ll now find and sort out the buildings I want to have in my scene and they must go well together and not look odd. I’ve downloaded a few assets from the store and now just playing around with them to find what’s best.
First building added
I’ve now added my first building into my scene, the building is called “Vis-Kiosk” it’s a little shop that sells food and accessories. This building and placement are based on one of the pictures I posted above (will put the picture below) but in the picture, the building is a cafe and not a little shop.
 This is the picture where I got the idea from, as you can see on the right-hand side you can see a little cafe and this gave me the idea to put a similar building there.
Ideas to add
- Zombie running across the road in the distance
- Park, other ideas from different films
- Add animals – Crows
- Add water
- Character to maybe walk through the scene
- Smoke
- Make a car drive and crash using Eliot AI – Set off an explosive effect by using a collider that triggers a partial system when the car hits
Tutorials for Eliot AI
Below, I’ve drawn up some ideas for what I want to add. On the first sketch I want a car to start driving when I play the scene and crash into a barrier and then the car sets a light and fire will come out from the car.
In the second sketch, I want a zombie to come out from buildings further down the scene and run towards and around the car then into the park towards the left and that’s where my other idea comes in. A park, I want to design a park on the left-hand side on a corner of the road.
I’ll design and create my park before I create a moving car and zombie.


Making a zombie walk across my scene
I recently got a program called “Eliot AI” and this allows me to create waypoints for my characters so when I play the scene the character goes to the waypoints I created.
I followed this tutorial for creating waypoints for my zombie to move across the road that I want in my scene.
Here’s the link for the tutorial I’m following, the channel is the creates of “Eliot AI” and they have other tutorials for other things you can create with “Eliot AI”
When I was following this tutorial I came across a few errors.
What errors did I get?
- Failed to create agent because there is no valid navmesh
- Animation must be marked as legacy
These were the two main errors I came across while following the tutorial and all I have done to fix them is used google, videos, and posts to help me fix these errors. I’ll leave all links below that I used to fix these errors.
Failed to create agent because there is no valid navmesh
The animation must be marked as legacy
After following all the tutorials and fixing all the bugs I finally have a walking zombie which walks to all the waypoints I placed down. Below is a video I recorded of what I’ve done so far with the zombie/waypoints.
Video
Here’s the video I recorded of me going through what I’ve created.
Creating the park
The picture below is a screen-shot from the film “I am Legend” and it’s the entrance of a park and I found this asset in the asset store that is similar to the picture from the film and I want to use this to create the entrance for my park. (pictures below)
I am Legend

Free asset

Park Update
For my park, I want to recreate a park from a game I’ve played called “Boneworks” I really like this layout of the park because it looks old and it’s all overgrown which goes with my theme. Below I’ll leave screen-shots of the park from “Boneworks” and recreate it using free assets.


To create this park I’ll need an asset with fences just like the pictures both, for this I’ll be using the free asset called “RPG/FPS game assets for pc/mobile” screen-shot below.

So far in my scene, I’ve added the fences for the outline of the park from boneworks, pallets, and pipe onto the building (screen-shots below)

Update
The red building in the picture (above) I’ve removed it and replaced it with a new one (screenshot below) this building is a lot bigger and looks more old and it goes well with the park design next to it which is great!.

In the picture (below) I’ve added a plan cube and turned it into the floor for the park, and I’ve added a floor texture to it.
I’ve also added more bushes around the area to close it in more, so the parks its own space.

Update
I’ve now added two tower block buildings (screen-shots below) and I’ve also added tables and chairs outside the shop/cafe building “Kiosk” because normally cafes have some tables and chairs outside.


After adding the table and chairs I added a wall behind them to close it off to give the cafe its own space. (screen-shots below).

This is my scene after adding the two buildings, tables and chairs and the wall. (screen-shot below)

I decided to add an umbrella into the scene with the tables and chairs. I couldn’t find one with the same colour so I found an umbrella in the “Windridge City” asset (screen-shot below) and the colour of the umbrella was black so I changed the colour to the same as the tables and chairs.


With the buildings and the wall there, my mum gave me an idea to add a car park just to the right behind the Kiosk building, my mum said it can be a private car park for the building owners so that’s what I done.
I started and added the rest of the walls for the car park and leave one big and little gap, this is for the cars to go in and out and the small one is a little gate for people to walk in and out.

Now I added the car park barrier to stop anyone from going into the car park and then I added the post for the walkway gate.

After adding the car park barrier I then added the road/pavement with road marks for parking spaces and added some cars to complete the car park.

After adding the car parking road marks it gave me an idea to add road marks on the roads in my scene to make it that life like. I also resized my crossing marks too I made them a little bit smaller and thinner because they were too big and too thick.

I went around and just touching up some paves and carbs (screen-shot below) so incase I do add a character to move around it doesn’t look odd.

Scene Update
Below is a screenshot of my scene so far! this is what I’ve created so far. My next idea is to add more buildings down on the right hand side, maybe I’ll add some shops or more houses/flats.

Video Update On My Scene
Below is a video I recorded just going around and showing what I’ve created so far, in the video I go around the whole scene showing everything.
Whats next?
My next move is to add so more buildings maybe add some shops or even more houses/flats. After adding some more buildings my next task that I want to do is add a moving car, and that moving car I want to crash into a barrier and set a light. For this to work I’ll need to follow “Eliot AI” tutorials and some others.
Moving car
In my scene I wanted a car to drive forward and crash into a barrier then set on fire, (sketch below) I followed a similar tutorial for the moving zombie I’ve in my scene and I’ve now got my car moving by following the tutorial (link below).
But I do have a problem with the moving car at the moment, when I play the scene the car works and moves to where I want it to but, it sinks just below the road I want the car to move on. I’ll record what I’ve done for the moving car and show the problem I’m having and try to fix this by doing research on google, YouTube and ask my tutor Matt.
Moving car tutorial
Car sketch idea
Video – Car moving but under the road its driving on
After trying to fix the bug where the car would drive under the road a bit (in video above) I was playing around in the settings of the car and managed to fox it. Below I’ll leave a video showing how I fixed it and showing the car driving on top of the road.
Video – Fixed driving car bug
The next thing I’ll do is add a barrier in the road and make sure the waypoint is in front of it because I want the car to drive into it, and I want to make an explosion and fire to set of when the car hits the barrier. By doing this I need to search how to trigger a partial system, this will alow the car to drive and then hit a collider of the partial and set them off.
I found this tutorial to help and give me an idea on what I need and what I need to do to make this work.
I found a way for this to work on my own, I added the barrier at the end of my waypoint and timed how long it takes the car to get from the start to the last waypoint and that was about 10seconds.
On the particle you can add an start delay so I put a 10second delay on it and as soon as the car hits the barrier and stops the explosion goes of just perfect.
Below you can see the particles start delay is on 10 and that’s how I’ve managed to get it to work.

Next I’ll do the same for the fire but with the fire I want it to start after the explosion so I put the start delay on 11 or 12. (screenshot below)

Below I’ll leave a short video showing the car crashing and the explosion and fire going off.
Video
Whats next?
Now I’ve the two main things completed that what I wanted in my scene (walking zombie and crashing car) I now want to add some destroyed buildings and add some grass, plants and trash over the scene to give it that old abandoned look.
To do this I’ve downloaded some free assets for the plants, destroyed buildings and trash, I’ll put screenshots of the assets below.
Assets


Below as you can see I added two tall buildings on the same side as the block of flats, and in between them I added a building that’s destroyed, old and overgrown.
I added trash, rubble, plants, bushes and grass to make it overgrown.

Update on broken building
Below is an updated picture of my broken building, I’ve added a lot more rubble, bricks, rocks and other broken bits to make it look more destroyed.

Update on all over the scene
I’ve now added water, grass, plants and bushes in my scene in the road, but not all completed, below I’ll leave a screenshot what I’ve done so far with the grass, bushes, plants and water.

Idea
I had this really cool idea which I think will go well with my scene, I came across this free asset of a billboard and because we’re in lockdown due to quarantine I thought I would add the billboard on top of the end building and add a sign saying “CAUTION QUARNTINE AREA” so I did just that. Below you will see a screenshot of the asset I found and the billbored with the sign.

Free asset I used

I now want to add some ivy plants to the buildings, I got some ivy plants and placed them onto one of the buildings (picture below) I think this looks really good on the building and will add some to the rest of the buildings.
But I now want to add the rest of the buildings to make the scene look almost complete. I’ll find some building assets and finish it off.

A look around my scene
Below is a video I recorded of me going around my scene and showing what I’ve created so far, I go around everything so you can see what I’ve done and what I’ve added.
This is just to show my progression on this scene.
New update
Below is a screenshot of a road I decided to add at the end of the road, the reason I decided to add this is I wanted a big building at the end of the road in my scene.
I got this idea from a YouTube video I found (screenshot below too).
Road/Junction

YouTube video idea

Below is my new building I’m going to have at the end of my scene, I chosen this building because its really tall and wide. This fits well with my scene because out in New York buildings are really tall and this building fits it well.

After adding the building at the end of the road, the roads needed extended because there was nothing at the end just a straight road, so I out a junction at the end, added traffic lights, crossings, paves, cerbs and roadmarks. (picture below)

I’ve now added some house next to the building (above) some it doesn’t look empty at the end of the road and its not just big tall buildings in my scene.

I’ve now added the rest of the buildings on the left hand side so now the left hand side on the scene doesn’t look empty. Next is to finish of the right hand side.

Onto finishing the right hand side of the buildings I added two more buildings which are the same as you can see in the picture below, and I’ve duplicated the destroyed building and put another at the end but re arranged it so its not the same as the other one.
All the building in the street are now complete!

What’s next?
I now what to add trees behind the buildings so it closes the scene up and give it more of an abandoned, overgrown type of feel, which is what I want.
After I’ve added all the trees I want to finish of adding all the Ivy on all the buildings with in the scene, I’ll keep updating everything I do.
Below are some pictures I’ve taken from some videos I found on YouTube and these gave me ideas for trees and where to place them and how many. Links to videos below pictures.


Video one
Video two
Now I’ve all the ideas on what to do I’m now going to start adding trees into my scene.
In the picture below you can see I’ve started to add some trees into the background to close the scene up and I think these trees fit the scene but I might add a few more but different ones. I also add a tree coming out of a windows of the house on the left of the picture, this tells you that the place has been left for years.
I’ll add some more trees coming out of buildings and add more around the scene.

At the back of car park where I placed the trees I decided to change the grass material to more of an old, dryed up look (picture below) I’ve also added it everywhere on the scene with grass patches.

Update
I’ve now added more tree’s, grass, plants, rocks, dirt, roots and some mushrooms around my scene and now it looks really good and looks more overgrown (picture below)

I’m now going to finish off adding Ivy to all the buildings just like the one in the picture above.
I’ve now added Ivy and some roots to the tall building on left picture above, below is a picture of the building covered in the Ivy now. I think I’ll add some plants and bushes the the top and bottom to make it look better.

As said above I’ve now added somemore bushes, plants, Ivy and grass onto the building and at the bottom of it. (picture below)

I’ve now finished adding Ivy and some plants on to the main building on the left hand side (picture below) and I then added a tree in between the first main building and the second one.

After completing the building it was best to do the arch way for the park, I added some Ivy onto it and some bushes around it. (picture below)

Added wire fences
I found an asset called “wire fence” and I added some of these into my scene to make it look more scary and a lockdown vibe. (pictures below)


Realistic Lighting
I found this video on YouTube and its to add realistic lighting in the scene, this would go perfect for my scene to make it look a lot better.
Update
I’m having a few issues with the software Unity, when I try to edit the scene and to add more items I just lag and then just freeze and it’s too much. I need to fix this bug/issue before I continue because I just can’t carry on like this.
I found this video (below) and this helped me out a lot! it reduced the lag so much. I had most of my settings on ultra which I didn’t know about and that was the main issue for the lag.
Bug
I’ve a bug with the traffic lights within my scene, below is a picture of the lights when the scene is run and I’ve spotlights pointing at a single light so it would only show one colour on one, you will understand it more below.
This is what I want the traffic light to look like and when the scene is running. As you can see it’s only on one light at the top and not the others.

But when I run the scene this is what the lights look like (picture below) and I only want them to show on one light.

For me to fix this issue I’ll re-do the light/spotlight by following a tutorial just to refresh it and get it working properly. But I’ll try and finish off the scene as much as I can before fixing this.
Update on lights
I’ve decided to take away the lights and the flashing lights on the street lights because they was too bright and it was bugging out a lot and I couldn’t fix it. So I’ve added a lightshape in place of the lights. (below will be a screen shot of the new lights I’ve added)


Also on some of the street lights I’ve added some sparks on some of them instead of a light, so it looks like the light has blown up and sparking. (video below)
Video of light sparking
I’ll be keeping the traffic lights off at the moment until I find an idea to replace and fix the ones I’ve now because the lights I’ve in my scene now wont shine in one spot where I have it placed and lights up the scene.
Update
With building at the back it was just plan and the was nothing there to make it look old and overgrown, so I added some trees just in front on the building (screen shot below) to make it look some what old and overgrown.


Now I’m going to add some Ivy to the building and maybe a tree sticking out from the top or about half way.
In the picture below I’ve started to add Ivy to the building, now I’m going to add some trees.

I’ve now added some trees coming out of the building and I decided to add more Ivy to the building and this gave the building more of an old/overgrown feel.

Now I’ve added trees and Ivy to the building to make it look old and overgrown below is a screen shot of it finished, I really like the design of the building it really stands out.

When I was looking at the view I can see an open space behind the car park to the right, so I decided to add an hill behind there and add dirt to it (screen shot below)

As you can see if the scene (below) you can now see the hill and not the open and the terrain like you did before. I want to add grass and some plants/bushes to the hill to give it that extra detail.

I added some grass and bushes to the hill behind the car park just to finish that side off. (screen shot below)

With adding the hill in the background gave me an idea to close the roads off at the end of the road, below i added an idea I came up with to do with adding an moving camera for a cinematic shot and this gave me the idea to close off the roads too.
I found an imagine on google is to type of thing I want to do (picture below)

As you can see the road turning and then its just a dead end but all overgrown. This is what I want to do in my scene but to both turnings.
Idea
I had an idea of adding an moving camera, so when I press play the camera moves to a certain place I want it to, so like a cinematic because I want the camera to show the whole street that I’ve created.
Adding overgrown blocked roads
I added in some GenericCliffs they’re basically a rocky hill with grass on top. Below in the picture you can see I added some going across and blocking the road.

After adding them I could still see past them and see the terrain still so I decided to add some tress to patch it up. Below is the finished picture of my blocked road.

Finshed blocked road

All I’m going to do is add this to the opposite side so they’re both blocked off. (screen shot below) I also added some bushes because its closer and to make it look better.

I think this has really come out well, a lot better than I thought. this gives to scene more detail and effects.
New update to scene
New update – I’ve found a new assets with better prefabs to replace within my scene, in my current scene I’ll be removing and replacing Ivy, buildings,cars,signs,fog and many more!
Assest

Anything I replace I’ll keep track of it on here, I decided to make this change because the new assest/prefabs look better and look more old to fit my scene, I feel like this is the right choice to do.
I deleted the old ivy which was on this building (below) and replaced it with the new Ivy and it looks so much better, its not too much but it’s just right and it still gives it the old look. I’ll leave a old and new pictures below.
The old picture as you can see the ivy was too much and just didn’t look right with the whole scene.
The new picture has now got the new ivy on the building and it’s not just covered in ivy like the old picture, it’s spread out fairly but still goes well with the scene.
Old Ivy
New Ivy

Old Ivy
New Ivy

This new Ivy stands out very well, it has that darkness texture that makes it look so good. The old Ivy just looked to cluttered whereas the new Ivy is more clean and less prefabs used.
Added Hotel sign to building
In the new assets I’ve, I found this hotel sign I put it ontop of this building, this stands out perfect because the building is really tall and suits a hotel style.

Replaced BillBoard
I’ve now replaced the billboard with a new one from the new assets I got, this new billboard is so much better and works a lot better than the old one. below I’ll leave an old and new pictures of the billboards.
Old BillBoard
New BillBoard

Me replacing this billboard with the new one is a good idea because the new one has Ivy already attached to the prefab so I don’t have to add any at all myself and that will save memory within the scene and plus this billboard looks older and blends in with the rest of the scene.
Replaced buildings
I’ve now replaced the buildings on the left hand side of the scene because the old buildings didn’t have any Ivy on it so I would’ve done that myself but, these new buildings already have Ivy attached to the building which is huge because the buildings look so much better and it saves so much memory because I don’t have to add any Ivy onto it as it’s already there.
Below ill leave a screen shot of the old buildings and then the new, so then you can see what I mean about not having to add any Ivy at all.
Old buildings
New buildings

It makes it so much better because the Ivy is spread out perfect and there’s not too much of it. I’ll be replacing some of the right hand side of the scene buildings with other buildings with Ivy already attached but making sure their not the same and are different.
I’ve also added some trees and bushes coming out of the new buildings that I’ve added in (pictures below) I’ll probably add some more during the progress of creating the scene.

The picture below is the buildings I had on the right hand side of the scene and I’ve now replaced the two of the left with a single tall building, the reason I replaced this is because the new tall building is all destroyed and looks like its been hit a few times whereas the old ones were perfect condition and didn’t look old.
Also the new building has Ivy attached to it too which saves me yet again more time and storage.
Old Building
New Building

The new building also has trees growing inside of it too which was already attached to the prefab and that also saved me putting in my own.
Added background building
Below is a screen shot of a building I added in for the background of my scene, because my scene is based in New York there are a lot of buildings and a lot of tall ones, so I decided to add a tall building but in the background, so it looks more realistic.
I also added a tower radio antenna ontop of the building for looks.

Below is a picture of the background building from the street view.

Background building update
I’ve moved the building that’s in the background of my scene closer because everytime I play the scene it was too far away to be in shot with the camera, I even done research to fix this but just couldn’t find anything.
Below is a picture of the updated building closer to the scene, I think it looks better than it did further away to be honest. It kinda looks like a car park building.


I dimmed the street lights
I’ve street lights going down the middle of the scene and the light prfabs coming from the lights were too bright so I dimmed them and made them less bright because it didn’t look right within the scene was just out of colour. Below I’ll leave a screenshot of the before and after so you can see the difference of the brightness.
Before
After

As you can see (above) it’s the perfect brightness for the scene.
I’ve now added some posters onto my roadblock that I’ve at the start of the road (picture below) It’s a warning sign to tell people to keep out due to the virus.

I’ve also added a “End of the world” sign just in front of the main camera for the street view (picture below)
These signs go all together well because they’re all based on a virus so it all looks legit.

Adding onto the destroyed building
on the right hand side of the scene I’ve a building that’s been destroyed and it needed more to it as it was empty, so I decided to add more bricks, rubble, rubbish, plants and concrete. (picture below)

I then also decided to fence off behind the destroyed building to close it in more. Below is a screenshot of the final picture of the broken building with the fence behind it.


I’ve now added trees just behind the fences of the broken building to close it off more and I also added some more bushes too. Below is a screenshot of the finished destroyed building.

Bus Crash Idea
While I was going to start adding cars I decided to add a bus at the end of the scene with the broken building and I decided to make it look like the bus crashed into the building, so I added the bus and put it on its side and put it touching the building (pictures below)
I then added some rocks,bricks,wood,grass and Ivy on and around the bus the make it look destroyed and old. All pictures down below.


Adding cars on the road
After adding the crashed bus in the scene I’m now going to start adding cars on the road, because the road is a two way some cars will be facing down towards the road and some on the other side of the road will be facing towards the camera.
Below I’ll post pictures of each car that I put into the scene and say what I’ve added around it.
First Car
This car I decided to make it look like the car came over from the other side of the road and crashed into the wall, I also added bricks,rubbish,wood and grass around the car.

Second Car
I now have added a truck onto the road but facing down towards the end of the road and I also added bricks,rubbish,wood and grass around the truck.

Third Car
I’ve now added in the third car into the scene and put it next to the truck and again I’ve added bricks,rubbish,wood and grass around the car and I also have connected the grass together with the van and the truck (picture below)

Bug
I’ve got a bug where when I press play the cars and bus doesn’t show in the scene they will be invisible like their not there. I had a call with Matt and he helped me solve this problem, in the prefabs of the cars there was like a cloine of the car, I had to disable that and change the view of the LOD, picture below.

Basiclly the LOD 0 wasn’t far enough for the main camera to pick it up in the scene. So I’ve now repeated this step to every car that is and will be on my scene so I don’t have the same problem.

Adding graffiti wall
Most abandoned places in the world mainly all have some graffiti on walls, so I decided to add in a graffiti wall. I downloaded a free asset from the asset store (picture below) and added a wall with graffiti on it (picture below)


I also added some grass down the left hand side of the scene outside the buildings because it need grass or plants there to make it look overgrown (picture below)

Cineimatic /Camera flythrough
Me and matt had spoken about adding a cinematic with a camera flying through the scene, and Matt suggested getting a software for Unity called “Pegasus” from the store and what this does is allow you to make waypoints for your camera to follow while flying in the air.
So I got this from the store and made my own waypoints, you can also add some focus points, so when you fly through the scene to each waypoint it can focus on something you want while going to the next waypoint. (all pictures below)
Beacasue I added my bike into the scene I wanted the cinematic flythrough to focus on my bike because it’s a main prefab of mine.
Pegasus from the Unity store

These are the waypoints, so the big yellow circles are each waypoint.

And these little blue circles are the focus points, so when the camera flys past towards the next waypoint it will focus on the focus point. At this focus point I’ve it looking at my bike so when you fly past you can see my bike close up.

This focus point is focusing at a destroyed building, when you fly through it shows how destroyed and overgrown it really is.

This is the last focus point at the end of the waypoints and this shows the bus crash, broken building and also the road cut off and blocked.

Now with the cinematic camera working I now have to block the road off because when the camera swings around to the right you can see the road with no prefabs and can see the terrian, so I have now added some rocks blocking the road with fences blocking it too and trees behind it, also one tree falling down and knocked a fence over too. (picture below)


After doing that I added a hill behind it all and added grass to give it that overgrown fibe.
I also added grass down the road too.

After completing them the road was still empty and you could still see the terrain, so I added a building so when the camera swings around you don’t see any of the terrain, and then also added a building in the background to block any site of the terrian off and it also gives it more detail to the scene. (picture below)

Video of camera flying around the new street (above)
Adding lines with Ivy
I’ve now added lines with Ivy attached to them going from building to building across the street (picture below) I think this is a great addition to the scene because it shows how overgrown it really is, with the Ivy covering the lines.


Added cars to the road
I’ve now added more cars to the road to complete it with the traffic side of things. Below I’ll leave screenshots of the new cars added into my scene.


These are now completed. My next idea is to add some barrels going down the road and all set alight, so when the scene starts all the barrels are on fire.
As you can see the picture (below) I’ve gone with three barrels together. I’ve now duplicated them in groups of three and spread them down the street. (screenshot below)


I’ll now add fire to every barrel and make them set alight when the scene is started and don’t go out during the scene.
I’ve now added fire to all the barrels and now when you start the scene they all set alight straight away and don’t go out during the scene. (screenshots below)


Adding zombie back in
I’ve now added back in the zombie after it was having a few bugs, which I’ve now fixed. The bug was to do with the waypoints and I also had to bake the zombie to the ground and that made it all work again.
I’ve added new waypoints and moved the zombies towards the start of the scene, so now when you play it the camera goes around the scene and at the start, you will see the zombie and go past it.
I’ll record a video of it all and you will understand this more. In the picture below you can see the new waypoints that I’ve done, you can see them go towards the flyby camera.


Video
Adding final rubbish prefabs
I’ve now added some more rubbish and spread them around the scene and I’ve completed with the rubbish and don’t need to add anymore. (picture below)

Last few things to do
- Add fog into the scene.
- Add sound effects – wind, thunder and rain.
- Add music when the scene starts.
Fog
I’ve now added fog into my scene, so now when you start it the scene will have fog everywhere. I’ll leave a screen-shot below. The fog is a particle which you can get from the store.


Wind, Rain and Thunder
To start with these sound effects I’ve added in wind sound effect, and I’ve set it to play from when the scene is played and also I’ve put it on loop.
After I’ve all the sound effects I’ll record a video so you can hear them.

I’ve found a video on how to add thunder and lighting into the scene, so I’ll follow the tutorial to add thunder and lightning into my scene, which I think will look really good.
I’ll try and add lighting bolts coming down in the background that would look cool.
Lighting
I’ve now added in lighting Bolts coming down from the sky by following the tutorial (above) I’ll leave screen-shots down below of what I’ve done so far. I think the lighting is a really good addition to the scene.


I’ve now added in thunder and lighting sound effect into the scene, I found the sound effect on YouTube. I’ll leave the video down below of the sound effect and also a screen-shot of the sound effect added into my scene.
Sound effect

Sound track
I’ve now added in my sound track for my scene, at the start of making my project I got the idea based from the film “I am legend” so I decided to go with the “I am legend” sound track.
I’ll leave the link to the YouTube video where I got the tack from and also leave a screen-shot of the sound track added into the scene.

I think that I’m pretty much done on my final project, I think that I’ve completed and finished it all. But I’ll make a recording of the whole scene and post it down below and go through the scene to see if I missed anything, look for bugs and to see if I could add anything else to it.
I’m really happy with the way my project has turned out, from looking back from when I first started and the see the progression I’ve made is incredible and I think I’ve done so well with the scene. I’m really happy with it.

Leave a comment